applied model
1. americas: ifp**50 - gen 1, ifp**50 - gen 2, ifp**50 - gen 3.
2. asia pacific & africa: ifp**50, ifp**50-2, ifp**50-3.
3. europe: ifp**50, ifp**50-2ep, ifp**50-3ep.
a usb update is used when ota (over the air) update is not a viable option or a complete re-flash of the firmware is required.
firmware files can be located on the "downloads" section of the product page of each model.if you would like to know the difference between an ota and a usb firmware update, you can click on the link below.
update instructions:
1. format a usb drive as fat32 (for instructions on how to format a usb drive to fat32 please see the link below).
2. extract firmware files to the usb drive.
a. for gen. 1 units (ifpxx50), extract the 'upgrade_510’ folder to the root of your usb drive (fat32).
b. for gen. 2 units (ifpxx50-2), extract the ‘upgrade_551’ folder to the root of your usb drive (fat32).
c. for gen. 3 units (ifpxx50-3), extract the 'upgrade_8386' folder to the root of your usb drive (fat32).
3. insert the usb drive into the side of you ifp.
a. for gen 1 units, insert the usb drive into the usb 2.0 port on the side of the unit next to the hdmi 1 port.
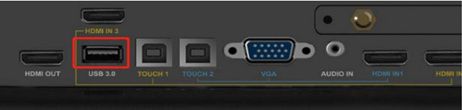
b. for gen 2 units, insert the usb drive into the usb 3.0 port.
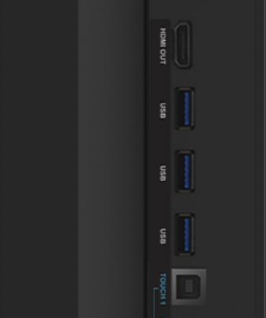
c. for gen 3 units, insert the usb drive into any usb port on the side of the unit.
gen. 1
gen. 2
gen. 3
two methods are available to upgrade the firmware on ifpxx50 (gen. 1), ifpxx50-2 (gen. 2), and ifpxx50-3 (gen. 3) series displays:
a. debug menu upgrade (recommended)
b. power key upgrade (to use when the screen is blank or no access to the debug menu)
a. debug menu upgrade procedure:
for all (gen. 1,2, and 3 units):
1. turn on the panel. press “input 9-9-1” on the remote control, and the debug menu will pop up.
2. select upgrade > upgrade all, press “enter”, and confirm.
3. the power led will flash red and blue during the upgrade process. when finished, the panel will reboot and enter the android channel. it will take approximately three (3) minutes to complete the upgrade procedure.
b. power key upgrade procedure:
for all (gen. 1,2, and 3 units):
1. start with the panel powered off.
2. power on the panel. as soon as the power key turns blue, press and hold down the power key until it starts to flash red and blue rapidly.
the display will upgrade. when finished, the panel will reboot and enter the android channel. it will take approximately three (3) minutes to complete the upgrade procedure.
note: usb update will completely re-image the ifp and all user installed apps and data will be removed. please back up files accordingly.